
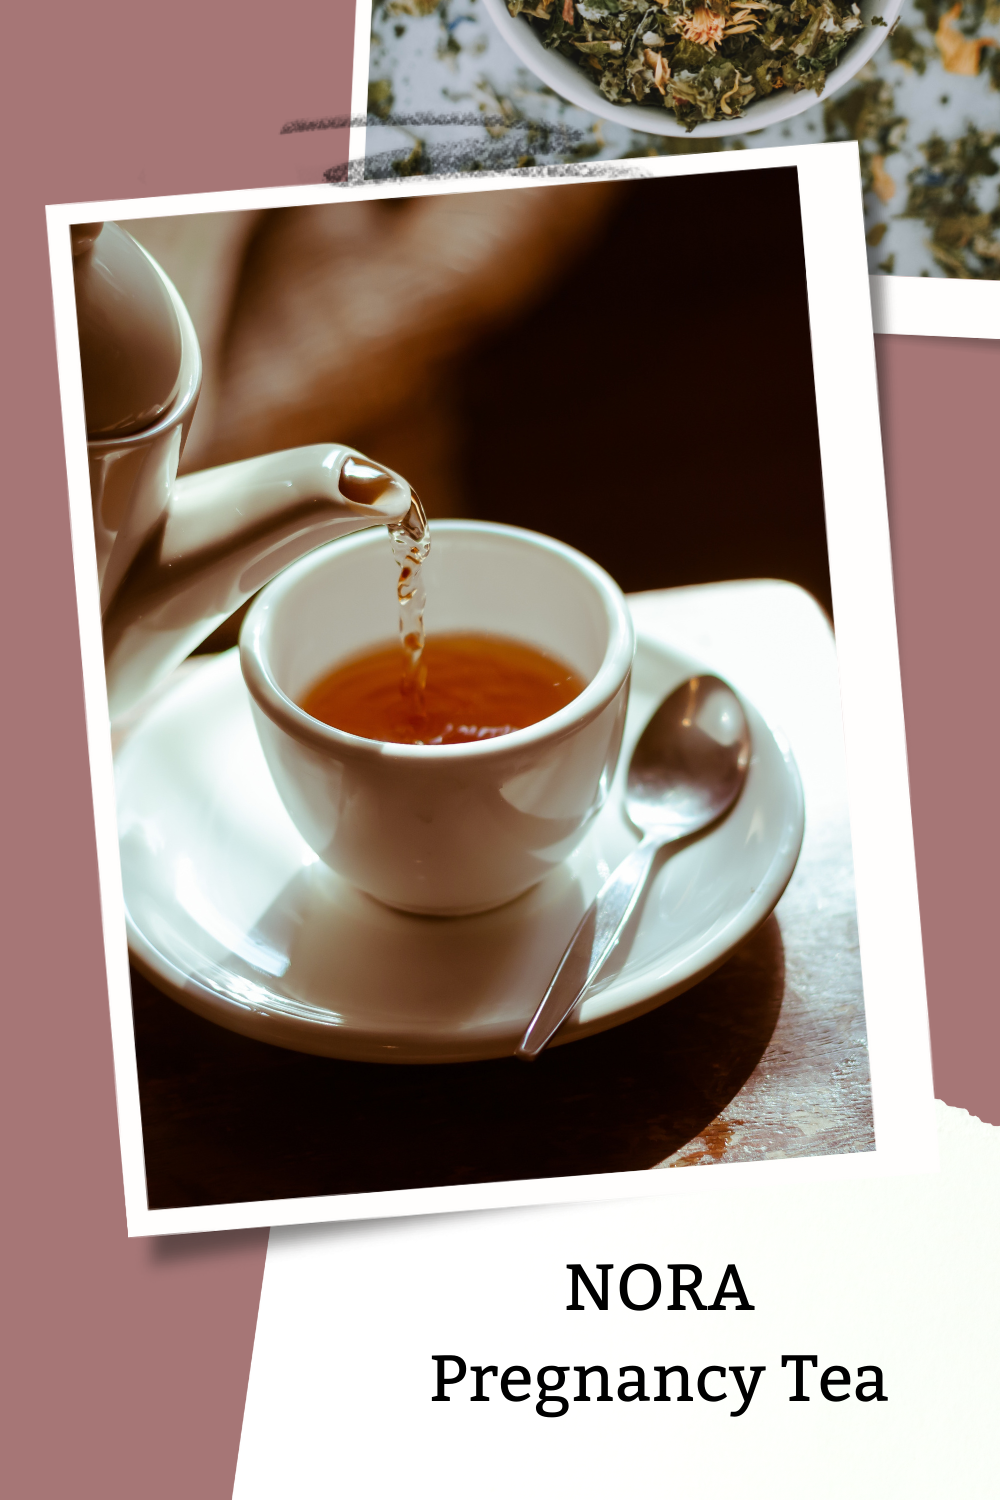
NORA Pregnancy Tea
NORA Tea is an important part of your Prenatal Care, because it is very nourishing, especially for the Pregnant or Nursing Mama. It stimulates your system to optimal health, optimizes mineral absorption, guards against anemia’s and maximizes the health of the liver, thereby helping to prevent many common pregnancy complaints, or minimize them. In my experience it prevents possible complications during the birth by helping to promote proper contractibility of the uterus, release of the placenta and by doing so it prevents hemorrhage and because of the health of the tissues, it reduces tears and the degree of them. After your baby is born, it will help your milk come in quickly, and the amount of production to stabilize. Also, it will help reduce the amount of time that you have a lochia flow postpartum.
NORA Tea consists of four ingredients: Nettles, Oat Straw, Raspberry Leaf, & Alfalfa. Begin to drink NORA Tea after the 16th week of pregnancy. Try to drink a quart daily, since then it will become a daily habit to prepare the tea. If you find it difficult to drink it daily, it is important to drink it at least 4 times a week, or half the quart daily.
This post contains affiliate links. I only link to products that I have personally used and feel comfortable recommending. If you use these links, it does not increase the cost for you. It does help support this blog and my family, which allows me to bring you more helpful content. I really appreciate it when you use these links to purchase these products!
NORA Tea — A Nourishing Tea for Pregnancy and Lactation
NORA Tea is an important part of your Prenatal Care, because it is very nourishing, especially for the Pregnant or Nursing Mama. It stimulates your system to optimal health, optimizes mineral absorption, guards against anemia’s and maximizes the health of the liver, thereby helping to prevent many common pregnancy complaints, or minimize them. In my experience it prevents possible complications during the birth by helping to promote proper contractibility of the uterus, release of the placenta and by doing so it prevents hemorrhage and because of the health of the tissues, it reduces tears and the degree of them. After your baby is born, it will help your milk come in quickly, and the amount of production to stabilize. Also, it will help reduce the amount of time that you have a lochia flow postpartum.
NORA Tea consists of four ingredients: Nettles, Oat Straw, Raspberry Leaf, & Alfalfa. Begin to drink NORA Tea after the 16th week of pregnancy. Try to drink a quart daily, since then it will become a daily habit to prepare the tea. If you find it difficult to drink it daily, it is important to drink it at least 4 times a week, or half the quart daily.
Blend the herbs:
Mix 2 parts (8 oz.) Raspberry Leaf and Nettles to 1 part (4 oz.) Alfalfa and Oat Straw. Mix well and place in a ziplock baggie. A large plastic Rubbermaid type container works well for mixing it. You can also add either Peppermint, Spearmint, Lemon Balm, or Rose Hips (a slightly tangy taste) for flavor. Buy small amounts at a health food store, in order to try them.
Prepare the tea:
(In the Evening) Place a half an inch of herb in the bottom of a quart size canning jar (a handful or two). Experiment with the amount of herb and strength of the taste to find what works for you. But please make sure there is at least approximately 1⁄2 an inch in the jar. Fill the jar to 1⁄2 to 3⁄4 of an inch from the top with boiling water. Stir the herbs down into the water so that they are all wet and mixed in and not floating. Cover the jar with a lid or small plate to retain the essential oils and let sit overnight. In the morning, strain using a small mesh strainer into another canning jar and your “tea” (technically an infusion, a concentrated tea) is now ready. Since this is a highly nutritious drink it is also strongly flavored. Some women love it and cannot get enough of it!! Some tolerate it and others have a difficult time. These suggestions are offered to help you maximize the amount you do drink. Feel free to experiment, so that you are sure to drink it frequently
To use:
Add some of the flavorful herbs listed above to make the flavor more enjoyable.
Add ice.
Add Honey, blackstrap molasses (source of iron), molasses, sorghum, or maple syrup to sweeten.
Blend 50:50 (or desired ratio) with fruit juice.
Add a squeeze of lemon, or lime, especially nice with Lemon Balm.
Cut with water (50:50 or desired ratio) to reduce strength of flavor.
Blend 50:50 (or desired ratio) with another herbal tea.
Please do NOT use artificial sweeteners in this tea.
(My favorite blend includes rosehips and lemon balm, and I like to mix it with lemonade over ice.)
Throughout this post I have linked to my trusted herbal sources for dried bulk herbs. I recommend buying in bulk (8-16oz) for the main herbs considering you will go through a lot of this tea if you drink it throughout your second and third trimesters, and into postpartum… but if you prefer buying in smaller quantities then you can purchase through Rosemary’s Garden. For the flavoring herbs I linked to smaller quantities (about 4 oz per herb).
*Here is a link to some handy large glass storage containers for your bulk herbs and teas.
During the postpartum period, I like to also add echinacea leaf to this mix in order to help ward off infections and mastitis during that sensitive time. During postpartum you should NOT use spearmint/peppermint as they may reduce milk supply.
Herbal info:
Nettles:
Scientific Name: Urtica Dioica
Active Ingredients: Histamine, Tannin, Saponins, AcetylcholineFormic Acid, Sterols, Chlorophyll, Glucoquinine, Serotonin, Iron, & Vitamin A, C, D and K in an easily absorbable form, very high in minerals, including silicon.
Actions: Astringent, diuretic, nutritive, detoxifier, galactagogue, decongestant, hypoglycemic & tonic.
Astringent means it reduces discharges. Galactagogue means it supports the production of breast milk.
Nettles are one of the most widely applicable plants we have. They strengthens and support the whole body. This is one of the most powerful plants we have to deal with allergic rhinitis, or more commonly known as pollen allergy or hay fever. Studies are also showing that it has a broad range anti-inflammatory usage, so is useful with migraines, arthritis, lupus pain etc. It is an extremely nutritive plant, high in vitamins and minerals, particularly iron, silica and potassium, and is showing broad antifungal effects as well. Through its diuretic effect it promotes detoxification and works to prevent bladder infections. It also strengthens the kidneys and adrenals, an important function during pregnancy with their increased work load. The readily assimilated high calcium content helps to diminish muscle pain in all areas of the body during pregnancy including the legs, round ligaments, cervix, back and also during labor as well. With its high Vitamin K content, it also is proactive in preventing excessive bleeding after the birth. Because it strengthens the blood vessels and maintains arterial elasticity it helps prevent hemorrhoids and varicose veins, because of this, it also helps to maintain a normal blood pressure. After the birth, it helps in the production of breast milk making it nutrient rich for the newborn. It has also been said to reduce postpartum hair loss.
Oat Straw:
Scientific Name: Avena Sativa
Active Ingredients: 50% starch, proteins, alkaloids, saponins, flavones, sterols, Vitamin B, silica, & calcium, magnesium, silicon, potassium, & iron.
Actions: Nervine tonic, anti-depressant, nutritive, demulcent, vulnerary.
Demulcent means soothes irritated tissue, and Vulnerary means aids in healing of wounds.
Oats is one of the best remedies for “feeding” the nervous system. It is useful for exhaustion and depression; it strengthens the whole nervous system, making it a preventative and protective herb to enhance your ability to cope with stress.
While being stimulating and energy-giving, they are also relaxing and an aid to sleep. Oats is also a uterine tonic, and works on strengthening the thyroid and balancing hormone production. It can be helpful for high blood pressure, varicose veins and hemorrhoids. It is also a soother for the digestive tract. It also lowers blood sugar and is useful for fluid retention.
It is one of the best sources for magnesium, helping irritability and calcium absorption.
Raspberry Leaf:
Scientific Name: Rubus idaeus
Active Ingredients: volatile oils, pectin, citric acid, malic acid, tannin, phosphorus, potassium, calcium, magnesium, & zinc, Vitamin A, B, C & E. Has the highest known herbal source of manganese.
Actions: Astringent, tonic, toning, pelvic and uterine relaxant.
Raspberry leaves have a long tradition of use in pregnancy to strengthen and tone the tissue of the womb, assisting contractions and preventing excessive bleeding. Raspberry also tones the mucous membranes through out the body; soothe the kidneys and urinary tract, and preventing excessive bleeding after the birth. Raspberry works on the digestive tract, stabilizing it. It continues its good benefits after birth by working to help milk production and recovery.
The tonic and relaxant actions on the smooth muscles of the uterus act to reduce the pain of uterine contractions during childbirth and makes them more effective and productive, shortening the duration of labor.
Currently there is some controversy surrounding the use of Raspberry leaf during pregnancy, which is unfortunate since it use has been associated with pregnancy and birth since ancient times according to their writings. The concern is early miscarriage. For this reason, it is recommended to use NORA tea after 16 weeks of gestation. I sincerely hope this controversy is settled quickly, so that women can again enjoy Raspberry’s wonderful help in dealing with the nausea of pregnancy, with out concern for their growing baby.
Alfalfa:
Scientific Name: Medicago sativa
Active Ingredients: Vitamin K, iron, chlorophyll, Vitamin A, B-6, E, D, & K, beta-carotene, biotin, folic acid, pantothenic acid, fatty acids, saponins, high in copper.
Actions: bitter, general tonic, alterative, diuretic
Alfalfa has a history going back to ancient times, cherished for its nourishing abilities for people and their animals. It has a deep tap root and grows in rich soils, making it very rich in trace minerals that it pulls up from deep below the surface. It purifies the blood, and is a powerful tonic. It balances the blood sugar preventing the swings of hypoglycemia common in pregnancy. It soothes the digestive tract, and contains the digestive enzyme betaine, and the saponins balance the intestinal flora.
Peppermint:
(Mentha piperita)
Soothes the digestive system, and circulatory system and relaxes the nervous system.
NOTE: Discontinue usage of Peppermint after you give birth as it is a lactation suppressant.
Spearmint:
(Mentha Spicata)
Same usages as Peppermint, it is a different species in a plant family.
Lemon Balm:
(Melissa Officinalis)
Soothes the digestive system, reduces stress, and has a tonic effect on the heart and circulatory system. Traditionally it has been used to bring the afterbirth. Combats allergies.
NOTE: Using large amounts of Balm may inhibit the body’s utilization of Thyroid hormones. Added as a flavoring to NORA tea, I feel is a safe usage of the herb, and not a “large amount”, which would mean 12+ cups daily.
Rose Hips:
(Rosa canina)
Nutritive, one of the best natural sources of Vitamin C we know of. Excellent tonic, aids the gall-bladder, kidneys and bladder. Strengthens connective tissue and helps relieve stress.
Bibliography:
The Complete Woman’s Herbal, Anne McIntyre
Nutritional Herbology, Mark Pederson
Wise Woman Herbal for the Childbearing Year, Susus S. Weed
The New Holistic Herbal, David Hoffman
This info was originally compiled by Vickie Liguori of In Due Thyme, 2006 (Source.)
Edited + added to by me, Kate Rose.
Elderberry Syrup Recipe
Have you heard the buzz over the magic of elderberries yet? Nature provides us with so many wonderful herbs to support our health, and Black Elderberries (Sambucus nigra) are especially helpful during cold + flu symptoms. They have been shown to both reduce the risk of contracting cold/flu illnesses as well as shorten the duration of illness if you do contract one.
In fact, world-renowned Israeli virologist Dr. Madeleine Mumcuoglu discovered that: “elderberry disarms the enzyme viruses use to penetrate healthy cells in the lining of the nose and throat. Taken before infection, it prevents infection. Taken after infection, it prevents spread of the virus through the respiratory tract. In a clinical trial, 20% of study subjects reported significant improvement within 24 hours, 70% by 48 hours, and 90% claimed complete cure in three days. In contrast, subjects receiving the placebo required 6 days to recover.”
I like to be proactive about my family’s health and wellness by supporting our bodies in a way that makes it unlikely that illness will be able to take hold. Elderberry syrup is one of the ways I support my family’s wellness through cold + flu season. However, buying it pre-made can be VERY costly. One tiny bottle can be $20-30!! When you consider you can buy a whole pound of elderberries for this amount of money, which will make enough syrup to last our family of five through TWO cold/flu seasons, then it’s really no competition. And making elderberry syrup is so easy and quick! You can have this herbal remedy brewed in under an hour…
This post contains affiliate links. I only link to products that I have personally used and feel comfortable recommending. If you use these links, it does not increase the cost for you. It does help support this blog and my family, which allows me to bring you more helpful content. I really appreciate it when you use these links to purchase these products!

Have you heard the buzz over the magic of elderberries yet? Nature provides us with so many wonderful herbs to support our health, and Black Elderberries (Sambucus nigra) are especially helpful during cold + flu symptoms. They have been shown to both reduce the risk of contracting cold/flu illnesses as well as shorten the duration of illness if you do contract one.
In fact, world-renowned Israeli virologist Dr. Madeleine Mumcuoglu discovered that: “elderberry disarms the enzyme viruses use to penetrate healthy cells in the lining of the nose and throat. Taken before infection, it prevents infection. Taken after infection, it prevents spread of the virus through the respiratory tract. In a clinical trial, 20% of study subjects reported significant improvement within 24 hours, 70% by 48 hours, and 90% claimed complete cure in three days. In contrast, subjects receiving the placebo required 6 days to recover.”
I like to be proactive about my family’s health and wellness by supporting our bodies in a way that makes it unlikely that illness will be able to take hold. Elderberry syrup is one of the ways I support my family’s wellness through cold + flu season. However, buying it pre-made can be VERY costly. One tiny bottle can be $20-30!! When you consider you can buy a whole pound of elderberries for this amount of money, which will make enough syrup to last our family of five through TWO cold/flu seasons, then it’s really no competition. And making elderberry syrup is so easy and quick! You can have this herbal remedy brewed in under an hour.
If you have tuned into my herbalism shares over on Instagram, you’ll know that I am rather traditional when it comes to creating herbal remedies. I believe in giving yourself some leeway when it comes to your herbal medicines. Follow your intuition and use what you have in your pantry! Don’t have fresh ginger? Use ground! Don’t have honey? Use maple syrup or date syrup or molasses or even alcohol (for adults only)! Sometimes I use far more ginger/cinnamon/cloves than this recipe calls for. Actually— most of the time I do. I also add Rosehips for added Vitamin C. Some herbalists add nettles, mullein, and echinacea (but I prefer not to— I create separate tinctures for those). Have fun with it! Trust your inner guidance.
Ready for the recipe? Here ya go:
(FYI: This is a bulk recipe that makes about 2.5 quarts. I keep two quarts in the fridge for our fam and gift the other half quart to my parents, usually. You can double this and freeze part of it as well but I found that for our fam of five this is the perfect amount to have on hand in the fridge for the season. Sometimes come January I make another batch.)
(Psssst— Scroll down and click the button below to download a printable pdf recipe card. It contains this bulk recipe PLUS a recipe for a smaller batch if you’re looking to only make about a pint or so.)
Elderberry Syrup Recipe
Ingredients:
1/2 cup dried elderberries
3 cups filtered water
1 tsp ground cinnamon (or a stick of it)
1 tablespoon ground ginger (or fresh peeled/sliced ginger- as much as you’d like within reason)
1/2 tsp ground cloves (or whole cloves— I’ve added a few tablespoons of whole ones when I quadruple the recipe)
3/4 cup raw honey* (preferably local)
Optional: 1 cup of rosehips for added Vitamin C (these are a little sour but taste great once sweetened. I also love adding these to hibiscus sweet tea for a lovely sweet and sour tea.)
Instructions:
Place dried elderberries and spices (including optional herbs) in a pot with the filtered water and bring to boil.
Reduce heat (medium low heat) and simmer for 30 minutes (it’s okay if it goes a bit longer).
Mash the elderberries, herbs, and spices to release all the juicy goodness.
Strain the mixture into a bowl using a strainer lined with cheesecloth. Really squeeze every drop of juice out of the berries.
Allow the juice to cool to room temp.
Gently stir in the raw honey (it is best to use raw honey due to the medicinal and preservative benefits it brings to this recipe, but for adults alcohol could be used here as well since it would be a preservative. Maple syrup and date syrup have been used too.) Blend thoroughly.
Pour into jars and label them. These jars will keep many months in a cool, dry pantry or fridge. I store mine in the fridge throughout the entire season and it seems to stay perfectly good.
*omit honey for babies under 1 year or use date syrup or maple syrup— I found my babe would drink the syrup without any sweetener until he turned one.
Dosage:
Children take 1 tsp daily for prevention, increase to 3x daily to treat symptoms.
Adults take 1 TBSP daily for prevention, increase to 3x daily to treat symptoms.
We don’t take this daily, but we take it about 2-3x per week for prevention throughout cold/flu season, and we take it 3-4x daily starting at the onset of cold-like symptoms.
Safety:
Elderberry syrup is generally regarded as very safe for the young and old and even while pregnant/breastfeeding. I have taken it while pregnant and breastfeeding, my children take it, and my parents take it.
Theoretically elderberry medicines could interfere with immunosuppressant therapies so if you have more a complex health situation you should consult your care provider.
There were rumors going around that Elderberries can cause “cytokine storms,” which is a severe systemic inflammatory response syndrome that arises from some infections, and is commonly linked to monoclonal antibody drugs (MABs). Cytokine release syndrome cases that are not related to MABs are VERY rare, and the ones that do happen tend to be quite mild and easily treatable.
Elderberries DO increase cytokines. They trigger a wide range of immunostimulatory effects that increase the release of both inflammatory and anti-inflammatory protein messengers known as cytokines. As with all herbs, the actions are adaptogenic based on what the body needs.
Inflammation is not always bad. When you are facing an acute illness, you actually need inflammation. This is how elderberry works. It increases cytokines which spurs the immune system into action to aggressively fight pathogens. To the best of my research, elderberry has NEVER been associated with a true cytokine storm.
In the words of one of my favorite herbalists, Richard Whelan:
“All medicinal herbs that have the power to do good have the potential to do harm. The old maxim 'the poison is in the dose' precisely describes how too much of anything can be bad for us. The ancient rule to 'firstly, do no harm is, to this day, held as the core directive by all practitioners of traditional herbal medicine. Not only are we careful to do our best to use the right herbs, but equally we take care to not give too much of them or use them overlong.
For some years now, against this proven and safe way of herbalism, there has been a rising tide of excessive caution and scare-mongering in many parts of the world. The same authorities that, not so long ago, decried herbal medicines as ineffectual, have now taken up a different adversarial position; that they are dangerous substances that should only be prescribed by Doctors, who of course have zero training in them.
Unfortunately, the same unnecessary fear and worry has crept into many natural health websites and popular publications on herbs. Herbs that we have safely used for thousands of years, that have no reports of adverse reactions in the medical literature despite widespread use by millions of people, are suddenly described as contraindicated because of something that should have been seen as completely unimportant, or at the utmost a merely theoretical concern, such as a laboratory study on one of the herb's constituents to use an all too common example.
I want to remind you that the reason that herbs can never be patented and owned by any individual or corporation is because they are, and always will be, the People's medicine. They belong to all of us and it is my great hope in sharing this work that you will learn how to use them wisely for yourself, and the people you care for. Be safe, but do not be afraid.”
The more I delve into the world of herbs, the more I realize that many of the warnings against their use have been manipulations to keep people relying on the pharmaceutical industry. You know your body and your health better than anyone. Trust yourself first. Take charge of your own health.
I take charge of my family’s health in many different ways.
Read more about our wellness arsenal here.
Remember, nothing on my blog should ever be construed as medical advice. Read my full disclaimer for more information.
Fire Cider Recipe
I’ve been feeling the call to be more self sufficient— to take my family’s health and future into my own hands and not rely too heavily on outside sources. Have you?
A few weeks ago, I started a popular herbal Oxymel— Fire Cider! The Greek word Oxymeli means “acid and honey”— which is exactly what an oxymel consists of. They are herbal medicines made with apple cider vinegar infused with herbs, then mixed with honey. Fire cider is a long held old fashioned remedy that is used to boost the immune system and to help aid the upper respiratory system. I decided to prepare a large batch for this years cold/flu season, because I am a big believer in terrain theory (over the commonly held germ theory.) I believe that if we support our bodies and immune systems, that we are able to avoid illness even if we come into contact with the germs…
This post contains affiliate links. I only link to products that I have personally used and feel comfortable recommending. If you use these links, it does not increase the cost for you. It does help support this blog and my family, which allows me to bring you more helpful content. I really appreciate it when you use these links to purchase these products!

I’ve been feeling the call to be more self sufficient— to take my family’s health and future into my own hands and not rely too heavily on outside sources. Have you?
A few weeks ago, I started a popular herbal Oxymel— Fire Cider! The Greek word Oxymeli means “acid and honey”— which is exactly what an oxymel consists of. They are herbal medicines made with apple cider vinegar infused with herbs, then mixed with honey. Fire cider is a long held old fashioned remedy that is used to boost the immune system and to help aid the upper respiratory system. I decided to prepare a large batch for this years cold/flu season, because I am a big believer in terrain theory (over the commonly held germ theory.) I believe that if we support our bodies and immune systems, that we are able to avoid illness even if we come into contact with the germs.
Here’s the recipe:
1 medium onion, chopped
10 cloves of garlic, crushed or chopped
2 jalapeno peppers, chopped
Zest and juice from 1 lemon
1/2 cup fresh grated ginger root
1/2 cup fresh grated horseradish root
1 Tbsp. Turmeric powder
1/4 tsp. Cayenne powder
2 Tbsp. Dried Rosemary leaves
1/4 cup of raw, local honey (adjust to taste)
Chop up all your ingredients. Fill your jars evenly, then cover with ACV. I use these plastic lids with silicone sealing rings for covering my mason jars when I am making tinctures and oxymels or storing herbs. Let sit in a cool, dry place for 4-6 weeks. Then strain through a cheesecloth (I like these or these because they are reusable) and add honey. Mix til incorporated, taste, and add more honey if desired. This doesn’t have to be refrigerated but it can be.
I do not follow perfect proportions with all of my herbal medicines. With folk remedies like this, I take a rather intuitive approach, and I use what I have. I did not have horseradish. I had more jalapeños and ginger and slightly less onion. I just chopped it all up and divvied it out between the 4 jars I had.
Do you make and take fire cider? Have you heard of it before? What are you doing to take charge of you and your family’s health?
A few serving suggestions:
🔆 Straight up: Rosemary Gladstar recommends taking 1 to 2 tablespoons of the oxymel at the first sign of a cold, and then repeating every 3 to 4 hours until symptoms subside. Some people also take fire cider as a preventative during cold and flu season.
🔆 Mix with lemonade or orange juice
🔆 Mix with hot water and extra honey to make a tea
🔆 Use in place of vinegar in salad dressings and condiments * (Recipe)
🔆 Drizzle on steamed vegetables or sautéed greens
🔆 Use in marinades for meat, tofu, and tempeh *
🔆 Add to soups and chilis *
🔆 Try a couple of dashes in a cocktail, such as a Bloody Mary (I like to make virgin bloody marys to drink with lox and bagels in the morning— as a special treat occasionally) *
*= before adding honey
I hope you enjoy this recipe, and that it brings you and your family an extra health boost this winter! I also support my family’s wellness with elderberry syrup, immune-boosting superfoods, plenty of fresh air & sunshine when we can get it, cod liver oil with vitamin D, and real, whole foods.
Click here to read more about our family’s full wellness arsenal.
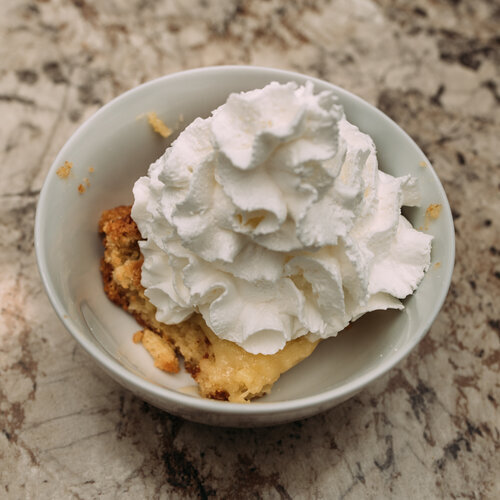
Bambino Huey Copycat Recipe ("Bambino Huxley")
Years ago, in the early days of my relationship with my now-husband, he told me about an exquisite, elusive dessert called the “Bambino Huey.” He had experienced it in an italian restaurant called “Boccone’s,” and he absolutely raved about its flavor and uniqueness. Boccone’s closed when he was a teenager and he hadn’t seen the dessert for nearly 20 years by the time he was telling me about it. His eyes lit up and I could almost hear his stomach growl as he described the special treat.
A few years and two kids later, my husband’s mom surprised him with some “Bambino Huey” for his birthday. Turns out, Al (the creator) was selling it out of The Bread Box bakery in Artisans’ Alley, San Antonio. She bought it “to go” in individual plastic ramekins, and we re-heated it and added real whipped cream at home. This was my first time to try the “Bambino Huey” and OH MY GOODNESS Y’ALL… it totally lived up to the hype! It was creamy and gooey and buttery and decadent and delicious! I had never tasted anything like it, so it was difficult to describe it. It was such a mystery, my mind started trying to piece together the flavors I was tasting. We were so excited to be able to get our hands on this delectable dish, but it wasn’t for long. The very next time we visited San Antonio, we went to The Bread Box only to find that he had stopped selling them there!
Another year or two passed before we heard news that Al would be selling his famous dessert at Conroy’s Bar & Grill. We were elated! We purchased them a few times through Conroy’s and delighted over the ability to get our “Bambino Huey Fix” once again. However, they were quite expensive, and my mind kept mulling over the flavors. I knew that this recipe was not that complex. I could see there was a cake-like layer with an additional goey, buttery, cream-cheesy layer. I just had to get the right ratios. So, inspired, I started testing recipes. It took me a few tries, but I now have a finalized recipe that our family swears is even BETTER than the original (dare I say it?).
So, without further ado, here is my Copycat Bambino Huey Recipe (I call it Bambino Huxley, named for my youngest son)…
This post contains affiliate links. I only link to products that I have personally used and feel comfortable recommending. If you use these links, it does not increase the cost for you. It does help support this blog and my family, which allows me to bring you more helpful content. I really appreciate it when you use these links to purchase these products!

Years ago, in the early days of my relationship with my now-husband, he told me about an exquisite, elusive dessert called the “Bambino Huey.” He had experienced it in an italian restaurant called “Boccone’s,” and he absolutely raved about its flavor and uniqueness. Boccone’s closed when he was a teenager and he hadn’t seen the dessert for nearly 20 years by the time he was telling me about it. His eyes lit up and I could almost hear his stomach growl as he described the special treat.
A few years and two kids later, my husband’s mom surprised him with some “Bambino Huey” for his birthday. Turns out, Al (the creator) was selling it out of The Bread Box bakery in Artisans’ Alley, San Antonio. She bought it “to go” in individual plastic ramekins, and we re-heated it and added real whipped cream at home. This was my first time to try the “Bambino Huey” and OH MY GOODNESS Y’ALL… it totally lived up to the hype! It was creamy and gooey and buttery and decadent and delicious! I had never tasted anything like it, so it was difficult to describe it. It was such a mystery, my mind started trying to piece together the flavors I was tasting. We were so excited to be able to get our hands on this delectable dish, but it wasn’t for long. The very next time we visited San Antonio, we went to The Bread Box only to find that he had stopped selling them there!
Another year or two passed before we heard news that Al would be selling his famous dessert at Conroy’s Bar & Grill. We were elated! We purchased them a few times through Conroy’s and delighted over the ability to get our “Bambino Huey Fix” once again. However, they were quite expensive, and my mind kept mulling over the flavors. I knew that this recipe was not that complex. I could see there was a cake-like layer with an additional goey, buttery, cream-cheesy layer. I just had to get the right ratios. So, inspired, I started testing recipes. It took me a few tries, but I now have a finalized recipe that our family swears is even BETTER than the original (dare I say it?).
So, without further ado, here is my Copycat Bambino Huey Recipe (I call it Bambino Huxley, named for my youngest son):
Copycat Bambino Huey Recipe
“Bambino Huxley”
Ingredients
Cake:
2.5 cups organic unbleached all-purpose flour
1.5 cups granulated sugar
1 TBSP Baking powder
1/2 tsp salt
20 TBSP (or 2.5 sticks) Butter, melted
2 eggs
Deliciously Gooey Topping:
1 (8oz) Package Cream Cheese, softened
12 TBSP (or 1.5 sticks) Butter, melted
1 tsp Vanilla
4 cups organic powdered sugar
2 eggs
Instructions:
Preheat oven to 325°F. I have the best results when using 9x13 metal baking pan, like this one. You can use a glass dish, but the texture of the crust does change slightly. You can also choose to make this in the original “Bambino Huey” style (individual portions) by baking it into ramekins like these, but I haven’t tried it this way since I’m always baking for a big group (hello family of five). Lightly grease your pan.
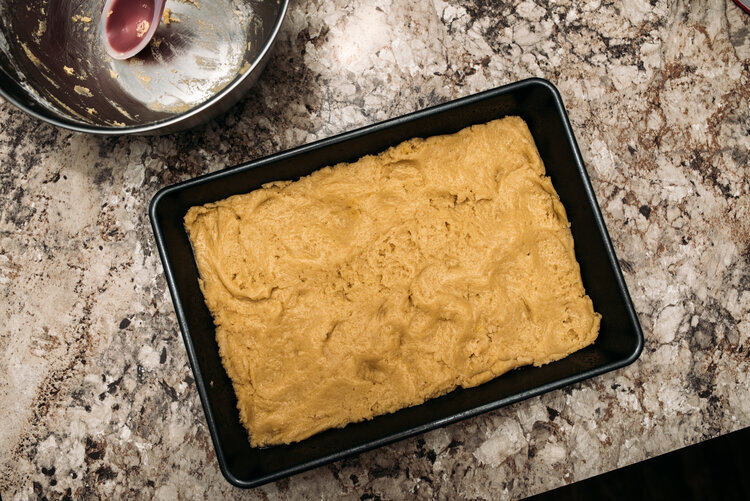
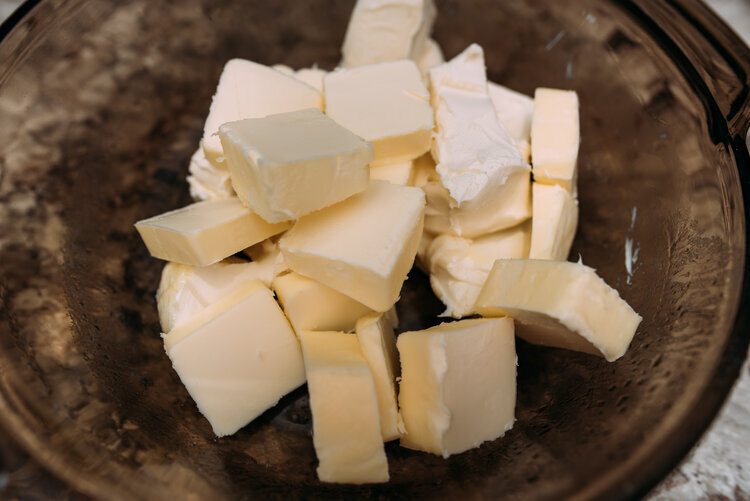
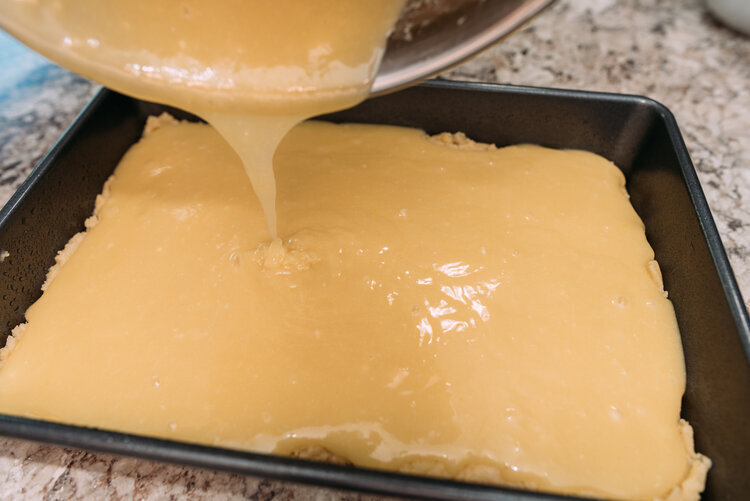
Combine the ingredients for the cake and mix well with an electric mixer, or with a fork. Press into the bottom of the lightly greased pan.
To soften the cream cheese and butter, I usually slice them both into a microwave safe bowl and microwave them until the butter melts, then I leave them sitting together for a few minutes.
In a large bowl, beat the cream cheese and butter until smooth. Add the vanilla, then half of the powdered sugar. Mix, then add the eggs and mix again. Now add the remainder of the powdered sugar and blend until smooth.
Spread the filling over the cake mixture.
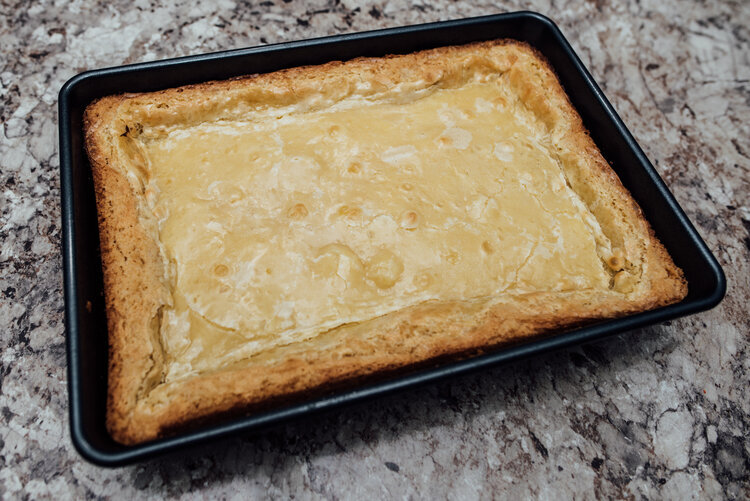
Place into the oven and bake for 40-45 minutes. Make sure not to overbake. The top/center is supposed to be gooey, so you mostly need to check that the cake edges are golden. You don’t want to burn the cake bottom.
Let cool 30 minutes.
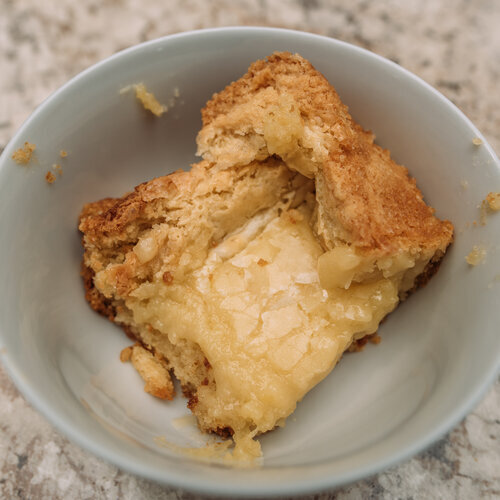
Serve warm with real whipped cream! This cake is super rich, so small servings are best. If the cake has cooled too much, just pop each serving in the microwave for about 10-15 seconds before adding your whipped cream.
The leftovers can be stored in the fridge (up to 3-5 days). Heat each serving in the microwave for 20-30 seconds before adding whipped cream and digging in. This dessert does freeze well. You can freeze the whole cake or you can create individual portions and freeze. Just thaw in your fridge and heat before serving.


French Toast Casserole Recipe
A few of you who follow me over on instagram saw that I made this french toast casserole recipe for a friend & client of mine who is freshly postpartum. I promised to share it with you so here I am!
This recipe is FABULOUS for new moms, busy moms, soon-to-be moms, etc. It is simple, quick, freezer-friendly, and can be prepared ahead of time so that all you have to do when it’s time to eat is pop it into the oven. It is INCREDIBLE. I found the original recipe over at Sally’s Baking Addiction and I’ve only tweaked it ever so slightly.
I first found this recipe when I was searching for freezer-friendly recipes to make and store in our deep freeze while I was pregnant with Zeke (my second son). Let me tell you– out of all the food I made and stored in our freezer (over 200 servings!)– THIS recipe froze the best. Plus it is SO easy to make four of these at once. The other night I made two for myself and two for my friend in just under two hours. You can really crank these babies out!
Without further ado, here is the recipe:
French Toast Casserole Recipe
Ingredients:
French toast base:
1 (12-14 ounce) loaf sourdough bread
1 cup (180g) fresh or frozen blueberries
8 large eggs
2 and 1/4 cups (540ml) whole milk
1 teaspoon ground cinnamon
3/4 cup (150g) packed dark brown sugar
1 Tablespoon (15ml) vanilla extract
Streusel Topping:
1/3 cup (69g) packed dark brown sugar
1/3 cup (42g) all-purpose flour
1 teaspoon ground cinnamon
1/2 cup (115g) unsalted butter, cold and cubed
Directions:
Grease a 9×13 inch pan with nonstick spray or butter. For freezer-friendly meals I have used the 9×13 nonstick foil baking pans without spraying anything first.
Slice & cut the bread into cubes, about 1-2 inches in size. Spread cubes of bread into the baking pan and sprinkle the blueberries over the top. Set aside.
Whisk the eggs, cinnamon, brown sugar, and vanilla together. Add milk and whisk to combine. Pour over the bread. Cover the pan tightly and stick into the fridge overnight.
**Note: The topping can be made ahead of time and stored in the fridge OR it can be made the morning of. I usually make it the night before. If you’re freezing the recipe, make the topping right away and sprinkle it over the casserole before freezing. To prepare the topping: Whisk the brown sugar, flour, and cinnamon together in a medium bowl. Cut in the cubed butter with a pastry blender or two forks.
After soaking the bread overnight, preheat the oven to 350°F (177°C). Take your casserole out of the fridge and sprinkle the streusel deliciousness over the top. Bake for 45-55 minutes or until golden brown on top. Serve immediately. Cover leftovers tightly and store in the refrigerator for 2-3 days.
Freezing Instructions: If you intend to freeze the casserole, be sure to make it completely (streusel topping and all) before sealing it up well (with foil or a container with a tight lid) and placing it in the freezer. It will stay good in your freezer for up to 2 months. When you’re ready to make it, thaw it overnight in the fridge, then bake as directed. I always freeze it BEFORE baking but the original recipe does say a baked casserole can be frozen for up to 3 months. Then you thaw it overnight in the fridge and warm it up in a 350°F (177°C) for 35 minutes or until warm in the center.
Well, that’s it! I hope you enjoy this recipe as much as I have! It is my GO-TO for freezer meals or a yummy meal to deliver to postpartum families.
Leave me a comment if you try it, I’d love to know what you think.

